26 Simple Tricks For Faster Editing (Premiere Pro CC)
This is a list of the keyboard shortcuts, features and techniques I use most frequently to help me edit faster. Almost no one talks about the small trimming shortcuts that aren't sexy enough to feature in Adobe keynote speeches, but shave seconds off basic tasks which allow you to edit at the speed of your thoughts. This covers the most basic to advanced trimming shortcuts that you might not even know exist.
I also included the equivalent function in Final Cut Pro 7, Final Cut Pro X, Avid Media Composer, and Davinci Resolve (assuming it exists).
If I get anything wrong please comment or email me and I'll fix it.
If you find this list daunting, read my blog post about how to incorporate keyboard shortcuts into your workflow. Depending on your level of skill this might be like your first day on the job as a construction worker and being handed a massive box of tools. tl;dr start with one or two shortcuts until they become muscle memory, and then add more as needed!
Here we go!
0. PUT THE MOUSE DOWN Some of these tips require using the mouse and admittedly it's sometimes faster to use the mouse to do something like position the playhead. Seriously though, start using the keyboard. You don't see professional Starcraft II players clicking the UI buttons on their screen do you? Of course not, it's only for selecting units and moving around the map. What really makes them fast players is their mind boggling use of keyboard shortcuts.
1. Add Edit (Shortcut) This is the absolute most basic thing in editing you will ever do, and yet I've seen professionals who STILL use the blade tool with a mouse. I don't care if the blade tool snaps to the playhead, map this shortcut to a key, move playhead, add edit, repeat.
My Setting - F3
Default Setting - (Cmd-K)
Final Cut Pro 7 - Referred to as "Add Edit"
Final Cut Pro X - Referred to as "Blade"
Avid Media Composer - Referred to as "Add Edit"
Davinci Resolve - Cmd-B - Referred to as “Razor”

2. Go to Next/Prev Edit Point (Shortcut) When you want to go to the next/prev edit points in other editing software it snaps to every single cut. Premiere has that function but also has a shortcut so that you can explicitly go to the cuts of only the activated tracks.
My Setting - (Up/Down) for edit points on all tracks, (Cmd-Up/Down) for activated tracks only.
Default Setting - (Shift-Up/Down) for edit points on all tracks, (Up/Down) for activated tracks only.
Final Cut Pro 7 - Goes to all edits
Final Cut Pro X - Goes to all edits (there aren't any tracks to activate or deactivate)
Avid Media Composer - Goes to all edits
Davinci Resolve - Goes to edits for activated tracks only.

3. Zoom In/Out (Shortcut) One way to quickly navigate your timeline is to zoom out, move the playhead and zoom back in to your point of interest. Stop using the expanding scroll bar thingy on the bottom of the timeline.
My Setting - (-) and (=), (1) and (2)
Default Setting - (-) and (=)
Final Cut Pro 7 - Referred to as "Zoom in/out in Timeline"
Final Cut Pro X - Referred to as "Zoom in/out"
Avid Media Composer - Referred to as "More/Less Detail" and is under the "hamburger" menu on the bottom left of the timeline. Can be mapped to a key using "Menu to Button Reassignment."
Davinci Resolve - Referred to as "Zoom in/out"

4. Hand (Tool) Yep, this a mouse based one but sometimes it's good for moving around without zooming in and out. Also, you can use the hand to move back and forth in the timeline during playback.
My Setting - (`)
Default Setting - (H) Backstory: I never ever used this tool before I had to use Final Cut Pro X. The reason I started is that in FCP X, if the skimmer is in the timeline and you press "Zoom" then it zooms toward the skimmer instead of the playhead. I used the hand tool instead of moving the mouse off screen or deactivating the skimmer every time I wanted to zoom. After using it in FCP X, I started using it in Premiere Pro too.
Final Cut Pro 7 - Same
Final Cut Pro X - Same and can be used as a hotkey so that it reverts to the previous tool after you let go.
Avid Media Composer - No equivalent, just use zoom in/out to navigate the timeline.
Davinci Resolve - No equivalent, just use zoom in/out to navigate the timeline.

5. Select Clip at Playhead (Shortcut) For when you don't want to pick up the mouse and you need to select a clip. There are two ways of selecting things in most NLEs: using in/out points and by clicking it with the mouse or using this shortcut. Some functions only work with one selection type or the other. For example, if you want to lift or extract you need to use in/out points, but if you want to nudge a clip up and down on the timeline or paste attributes from clip to clip you have to click it with your mouse.
My Setting - (C)
Default Setting - (D) Backstory: I also started using this when I had to use Final Cut Pro X. I use it for a number of reasons in Premiere Pro, but one of the biggest is that "Replace Edit" (aka Replace with clip - from source monitor, match frame)only works on selected clips.
Final Cut Pro 7 - Does not directly exist, but you can do it by first pressing "Mark Clip" and then "Select In to Out"
Final Cut Pro X - Referred to as "Select Clip"
Avid Media Composer - N/A
Davinci Resolve - Referred to as “Select Nearest Clip/Gap”
6. Deselect-All (Shortcut) Right now you're probably saying: "Come on, is it THAT BIG A DEAL to deselect something by clicking the mouse?" Yes, when you consider how often you're selecting things. If you have to go to your mouse and click off the screen to deselect stuff every single time, then having a shortcut will save time. This one is so second nature to me I almost forgot to include it.
My Setting - (Cmd-D)
Default Setting - (Shift-Cmd-A)
Final Cut Pro 7 - Same
Final Cut Pro X - Same
Avid Media Composer - Not really applicable because Avid uses in/out points for all it selection based functions. There is a shortcut for "Deselect All Tracks" though.
Davinci Resolve - Same

7. Match Frame (Shortcut) If you're in the timeline and you need to quickly open a clip in your Source Monitor then "Match Frame" is your friend. This one should also be second nature because you'll be doing it constantly. Also if you match frame from a clip with in/out points then that clip's in/out points will be set in the Source Monitor
My Setting - (H)
Default Setting - (F)
Final Cut Pro 7 - Same
Final Cut Pro X - Referred to as "Reveal in Events Browser."
Avid Media Composer - Same
Davinci Resolve - Same

8. Replace with clip - from source monitor, match frame (aka Replace Edit) (Shortcut) Whew, that's a mouthful. This incredibly useful shortcut should be right alongside Overwrite and Insert. This is very useful when you want to replace a clip in the timeline with one in the Source monitor by lining up the playheads to a specific frame in both clips.
For example, you have a clip in the timeline with a punch that syncs to the music beat, but you want to replace it so that instead there's an explosion syncing to the music beat instead. You just put the playhead for each clip at the appropriate frame, select the timeline clip and use the shortcut.
My Setting - (N)
Default Setting - (none)
Final Cut Pro 7 - Referred to as "Replace Clip." Does not require selecting the clip first (yay!)
Final Cut Pro X - Closest equivalent is "Replace at Start" and "Replace at End" but in my opinion is not comparable in utility.
Avid Media Composer - Referred to as "Replace Edit." Does not require selecting the clip first (yay!)
Davinci Resolve - Referred to as “Replace”

9. Lift & Extract (Shortcut) Lift is for when you want to remove a section marked by in/out points and leave a gap, and Extract for when you want to remove a section marked by in/out points and leave no gap. These have a double function because clips that are lifted or extracted are added to the clipboard which means you can then paste them back into your timeline.
My Setting - Lift (Z) Extract (D)
Default Setting - Lift (;) Extract (')
Final Cut Pro 7 - Lift is the same, Extract is referred to as "Ripple Cut."
Final Cut Pro X - The basic "Cut" is functionally the same as "Extract." "Replace With Gap" works similarly to "Lift" but doesn't add to clipboard.
Avid Media Composer - Lift and Extract are the same but do not add to clipboard. If you drag an "opt" to those shortcuts using the "Command Palette" then pressing those shortcuts will put the selection in the Source Monitor Timeline which is functionally the same as a clipboard.
Davinci Resolve - Lift (Delete Selected), Extract (Ripple Cut)
10. Paste Insert (Shortcut) Just like the name says, pastes a clip into the timeline, but have it insert instead of overwrite.
My Setting - (Ctrl-V)
Default Setting - (Shift-Cmd-V)
Final Cut Pro 7 - Same
Final Cut Pro X - Default behavior of pasting is "Paste Insert."
Avid Media Composer - Default behavior of pasting is "Paste Insert."
Davinci Resolve - Same

11. Swap Clips (Feature) If you want to move a clip to another part of the timeline without creating a gap, hold (Cmd-Opt) and drag the clip to where you want it to go and the surrounding clips swap around.
Final Cut Pro 7 - First click and hold on the clip, THEN press (Option) and drag clip to where you want it.
Final Cut Pro X - Default behavior of Magnetic timeline, just drag and drop.
Avid Media Composer - Using the Yellow Arrow, drag the clip to where you want it to go.
Davinci Resolve - Hold Cmd+Shift while dragging clip. Or select a clip and use Swap Clips Towards Left/Right
12. Trim Edit (Shortcut) Your most basic trim mode which allows you to fine tune a cut using the trim forward/backward shortcuts. Can also be used just by clicking a cut. Once it's activated you use the "Trim Forward/Backward" and "Trim Forward/Backward Many" shortcuts.
My Setting - (U) for Trim Edit mode. For trimming back and forward I use (,) and (.) for one frame and (M) and (/) for many frames.
Default Setting - (T) Trim Edit mode. Trim Back (Opt-Left) Trim Forward (Opt-Right) Trim Back Many (Opt-Shift-Left) Trim Forward Many (Opt-Shift-Left)
Final Cut Pro 7 - Referred to as "Select Nearest Edit"
Final Cut Pro X - Referred to as "Select Left and Right Edges"
Avid Media Composer - Referred to as "Trim Mode"
Davinci Resolve - “Select Nearest Edit Point”

13. Extend Edit (Shortcut) Instead of using the mouse to drag the head or tail of a clip, just position your playhead to where you want the clip to be extended to and press the hotkey for either "Extend Next Edit to Playhead" or "Extend Previous Edit to Playhead."
My Setting - Extend Next Edit to Playhead ( [ ) Extend Previous Edit to Playhead ( ] )
Default Setting - Extend Next Edit to Playhead (Shift-W) Extend Previous Edit to Playhead (Shift-Q)
Final Cut Pro 7 - Same, but the cut you want to extend must be selected first.
Final Cut Pro X - Same, but the cut you want to extend must be selected first.
Avid Media Composer - Same, but first In/Out points must be set before/after the cut you want to extend.
Davinci Resolve - Located under: Trim->Roll->End to Playhead, Trim->Roll->Start to Playhead
14. Timecode Extend Edit and Nudge (Shortcut) If you know precisely how many frames you want to trim a cut, extend an edit or nudge a clip. Just select the cut or clip and press (+) or (-) on the keypad then the number of frames and press (Enter). Also, if you select the clip you can move it forward/back in the same manner.
Final Cut Pro 7 - Same.
Final Cut Pro X - Same.
Avid Media Composer - Same for cuts, but not nudging clips.
Davinci Resolve (17) - Requires first pressing shortcut Playback->Go To-> Timecode

15. Trim Next/Previous Edit to Playhead (Shortcut) This is one of my FAVORITE trimming features in Premiere Pro. Sometimes you just have to cut a little head or tail of a clip and not affect the timing of anything around it. Just put the playhead at the trim position in the clip then either lop off the head or the tail. A gap will appear in the surrounding area.
My Setting - Trim Previous Edit to Playhead (Shift-Q), Trim Next Edit to Playhead (Shift-W)
Default Setting - Trim Previous Edit to Playhead (Opt-Q), Trim Next Edit to Playhead (Opt-W)
Final Cut Pro 7 - Doesn't exist, you just have to select a portion with in/out points and delete, or cut a clip portion and delete.
Final Cut Pro X - Referred to as "Trim Start/End" Make sure the "Position" cursor is active.
Avid Media Composer - N/A
Davinci Resolve - Referred to as “Trim Start/End”

16. Ripple Trim Next/Previous Edit to Playhead (Shortcut) Same as the above but the resulting gap is closed after the clip is trimmed.
My Setting - Ripple Trim Previous Edit to Playhead (Shift-E), and for Ripple Trim Next Edit to Playhead (Shift-R)
My Setting - Ripple Trim Previous Edit to Playhead (Q), and for Ripple Trim Next Edit to Playhead (W)
Final Cut Pro 7 - Doesn't exist, you just have to select a portion with in/out points and ripple delete
Final Cut Pro X - Referred to as "Trim Start/End" Make sure the "Select" cursor is active.
Avid Media Composer - Referred to as "Top" and "Tail."
Davinci Resolve - Referred to as “Cut Head” and “Cut Tail”
17. Select Nearest Edit Point as Trim in/out (Shortcut) There are a variety of trim modes and this skips straight to trimming either the in or out point and not affecting any clips around it.
My Setting - (6) for "Select Nearest Edit Point as Trim Out" and (7) for "Select Nearest Edit Point as Trim In"
Default Setting - (none)
Final Cut Pro 7 - N/A
Final Cut Pro X - Activate the "Position" cursor then use the "Select Left/Right Edges" shortcut and the trim keys.
Avid Media Composer - When in "Overwrite Trim Mode" (red film can icon) use "Trim A/B Side"
Davinci Resolve - Located under menu Trim->Select Nearest Edit To and “Resize In/Out”
18. Select Nearest Edit Point as Ripple Trim in/out (Shortcut) Again, same as the one above except will affect the clips around it.
My Setting - (8) for "Select Nearest Edit Point as Ripple Trim Out" and (9) for "Select Nearest Edit Point as Ripple Trim In"
Default Setting - (none)
Final Cut Pro 7 - Select the cut and use "Toggle Edit Type."
Final Cut Pro X - First activate the "Select" cursor then use the "Select Left/Right Edges" shortcut and the trim keys.
Avid Media Composer - When in Trim Mode use "Trim A/B Side"
Davinci Resolve - Located under menu Trim->Select Nearest Edit To and “Ripple In/Out”

19. Cmd-Drag to select multiple cuts (Feature) This one is useful a number of situations and in all of them it feels SUPER AWESOME. What if you have multiple thru-edits? Just hold Cmd, drag to select all the cuts and press delete. Done. Want to add multiple transitions? Select all the cuts and add them.
Or maybe you're doing a montage of very quick clips that are each 5 frames long, but you decided you want them all to have 1-2 frames of black in between? Just hold Cmd, drag to select all the cuts, use the #12 shortcut to change the trim mode and trim them all at the same time!
Or again maybe you're doing a montage with very quick clips but you want to make them all longer. Cmd-Drag to select all the cuts, put them all in Ripple Trim mode and use trim keys to make them longer!
Or you want to slide a bunch of clips over, just Cmd-Drag to select the cuts between them and use your trim shortcuts!
Or maybe you have a narration track that you've cut up, but because of the low ambient noise in the room you're getting audio pops at the heads and tails. You can copy a 1- frame transition, Cmd-Drag to select all the cuts and paste that transition to every head and tail!
Final Cut Pro 7 - The "Edit Selection Tool" can do this, but only for clips on separate tracks (I had never used this tool before so thanks to @joshchaplin for the tip!)
Final Cut Pro X - N/A
Avid Media Composer - N/A
Davinci Resolve - N/A?
20. Nudge Clip Selection left/right/up/down (Shortcut) Sometimes you just need to move a clip a little bit to the left or right or to organize your timeline you move clips up and down. Keep in mind, moving clips with this shortcut will cause the clip you're moving to overwrite anything it comes in contact with.
My Setting - Nudge up/down (Option-up/down), Nudge left/right (Opt-,/.), Nudge left/right many (Opt-m/(/))
Default Setting - (Opt-up/down) (Cmd-Left/Right) (Shift-Cmd-Left/Right)
Final Cut Pro 7 - Same, but will not overwrite adjacent clips when nudging in any direction.
Final Cut Pro X - Nudge Left/Right are the same, but due to the Magnetic Timeline there's less need for "Nudge Up" though if you must, "Lift From Primary Storyline" functions similarly.
Avid Media Composer - Select clip with Red "Overwrite" arrow and then use trim keys.
Davinci Resolve - Referred to as “Move Clips Up/Down”

21. Slide Clip Selection left/right (Shortcut) Just select the clip and use this shortcut to slide a clip which means the clip's duration stays the same but it's moved around the sequence and clips around it adjust accordingly. Alternately, you can select the cuts before and after a clip, press "Trim Edit" and then use shortcuts or JKL to trim.
My Setting - (Control) plus my trim shortcut keys.
Default Setting - (Opt-,/.) (Opt-Shift-,/.)
Final Cut Pro 7 - Slide Edit tool only.
Final Cut Pro X - While using the "Trim" tool, option-click and drag a clip with the mouse or use trim shortcut keys.
Avid Media Composer - Hold Shift-Option and drag from right to left (yes it matters which direction) over the clip you want to slide then use trim shortcuts or JKL.
Davinci Resolve - “Select Nearest Clip to -> Slide” will select the clip and put you in trim mode. Then you use your trim shortcut keys to slide the clip!
22. Slip Clip Selection left/right (Shortcut) Just select the clip and use this shortcut to slip a clip if you want to maintain the position of your clip in the timeline but you want the clip's timecode to start earlier or later. I use this often to adjust my music to make sure the edits are smooth or fix sync on the picture or sound.
My Setting - (Shift) plus my trim shortcut keys.
Default Setting - Slip left/right (Opt-Cmd-Left, Opt-Cmd-Right), Slip left/right many (Opt-Shift-Cmd-Left, Opt-Shift-Cmd-Right)
Final Cut Pro 7 - Slip Edit tool only.
Final Cut Pro X - Default behavior for clicking a clip with the "Trim Tool." Use the mouse or trim shortcuts.
Avid Media Composer - Activate proper timeline tracks, place playhead over clip and use trim shortcuts (no selection required). Or hold Option and drag from right to left (yes it matters which direction) over the clip you want to slide then use trim shortcuts or JKL. ---
Davinci Resolve - “Select Nearest Clip to -> Slip” will select the clip and put you in trim mode. Then you use your trim shortcut keys to lip the clip!

23. Dynamic Trimming (Feature) This mode allows you to trim using the JKL keys so that it's playing while you're trimming and you can start and stop during it. Just be in "Trim Edit" mode and then play forward or backward and the cut will move accordingly. Make sure you don't just click a cut, you have to explicitly be in "Trim Edit" mode to do JKL trimming.
The advantage of this mode is that it lets you play back and then press a button when you want the edit to occur. Sometimes it's not about number of frames, it's just what "feels" right, and this playback and edit function lets you do that.
Final Cut Pro 7 - First double-click a cut to be in "Trim Mode" make sure "Dynamic" is checked in the Trim Window and then use JKL. Final Cut Pro X - N/A Avid Media Composer - Activate "Trim Mode" and use JKL.
Davinci Resolve - Referred to as “Dynamic Trim Mode”
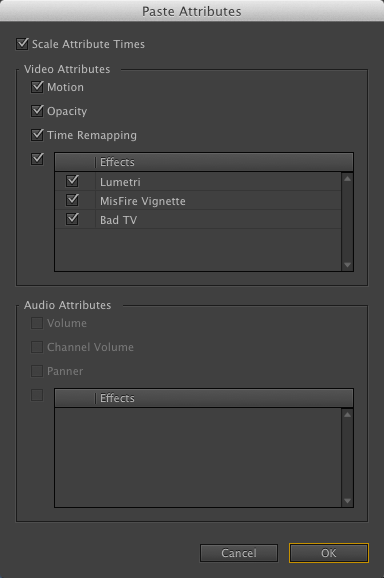
24. Paste Attributes (Shortcut) For when you have a clip that you've applied some effects or transformation properties to that you want to reuse. Just select the clip, hit "Copy" and use Paste Attributes on the clips that you want to put those on. I used that a lot for this blog post's video because I wanted to copy the position and zoom of the clips.
My Setting - (Shift-V) Default Setting - (Shift-Cmd-V) Final Cut Pro 7 - Same Final Cut Pro X - Same Avid Media Composer - Does not exist, but if you put the playhead over a clip with effects then from the Effect editor you can drag a copy to other clips. ---
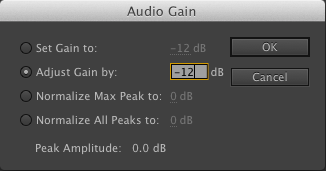
25. Audio Gain (Shortcut) Just select the clip, press the shortcut and punch in how many dB louder or quieter. You can either enter a precise dB value or do what I do and make sure "adjust gain by" is the one selected. Then just enter the number of dB you want to add or subtract. If you're adding dB you don't need to use a plus, but if you're subtracting make sure to use a (-) before the number. This is my preferred method of changing audio levels
My Setting - F2
Default Setting - G
Final Cut Pro 7 - Referred to as "Levels."
Final Cut Pro X - Referred to as "Adjust Volume Relative..."
Avid Media Composer - Clip Audio Mixer allows you to change levels of clips under selected tracks under the playhead.
Davinci Resolve - N/A?

26. Cut based Audio Mixing (Technique) Everyone has their own way of rough sound mixing. Some people like using keyframes and the pen tool, but I don't like that because it's difficult to quickly make changes. The way I learned is to put cuts around the section of music or audio I want to affect, change the audio levels and then add some audio transitions to make the gain fade up or down. Then if I need to affect the duration of either the fades or length of the audio level changes I just trim the audio or transitions. Also, it's very easy to reset. ---
Those are all my tricks (so far). If you add these to your editing shortcuts and techniques to your muscle memory then you can become a much faster editor, especially if currently you mostly use your mouse. I also recommend a tablet instead of a mouse, it's better for your ergonomics and can be faster in many situations. The only thing that's not so good about it is that for those times you need to fine tune something by mouse in which case the tablet is usually too sensitive.
If you have more tips please leave a comment, I'm always looking for more!